How to create Outlook mail merge sessions using Outlook Contacts
This article shows you how can you do a Word mail merge session using Outlook and why would you use our product, Easy Mail Merge, for your mail merging needs.
As you may know, Microsoft Outlook in combination with Microsoft Word offers a method for mail merging, called Word mail merge. However, that method requires a lot of training and it imposes several restrictions: you must use Microsoft Word to edit the email, you can only use Outlook distribution lists for the mail merge, you can't personalize the email subject line and you can't customize the email content based on logical conditions. Moreover, you can't even set delay periods between outgoing emails, making the mail merge session a sure victim of server based anti-spam applications, thus risking that your own email address will be flagged as a spam address.
By using Easy Mail Merge for Outlook, all the above functions are easily achieved. If you search the web, you may find other similar solutions, but they are stand-alone products and so you can't benefit from the Outlook message editor features, making you to spend a lot of time understanding how to compose and send a personalised email.
Last but not the least, Easy Mail Merge benefits from a license price which is lower than the one of competing products. Plus, you get a 30 days money back guarantee, one year FREE upgrades and FREE lifetime service support.
To learn more about Easy Mail Merge, click here.
 Why to personalize a mail merge session? Why to personalize a mail merge session?
Sometimes, like when you go out on vacation or when you distribute a newsletter, you just need to send the same email to several contacts, but at the same time you would like to personalize that message, so it doesn't look like an automated email. On the following example, we will show how to use the Mail Merge feature of MS-Outlook, in order to send a customized message to the people from a Contacts List of Outlook. We will send the same email message to all the contacts from our list and each email will start with a greeting text, followed by the real name of each contact.
Tip: If your desired contacts are not yet recorded to an Outlook Contacts List, then you may want to consider using Email Address Collector to export email contacts from your mail folders to Outlook Contacts.
 How do I use Word mail merge? How do I use Word mail merge?
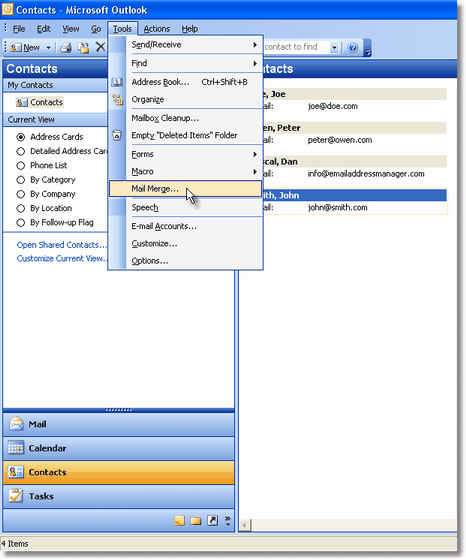
First of all, from Outlook open the Contacts List view. Depending on your Outlook view settings, you can display the Contacts List either by clicking on the Contacts bar (if visible) or by browsing to the Contacts folder through the mail folders browsing panel.
If you wish to send the email only to some of the contacts, then select them one by one or filter then using the Customize Current View of the Outlook View menu. Then, once the Contacts List is shown, go to "Tools->Mail Merge...".

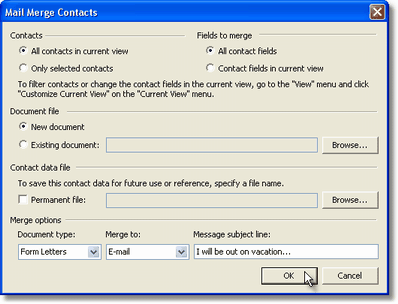
On the Mail Merge Contacts window, depending on your previous contacts selection, choose to send the email to all your contacts or only to the filtered/selected ones.
If you wish to use an existing MS-Word template for the new mail merge session, select the "Existing Document" radio button and browse to that Word file. To save your current selection, check the "permanent file" option and enter a name for it.
From the Merge Options frame, select to Merge to E-mail and enter a subject for your message. Then hit "Ok" to proceed to the next step.

MS-Word will open the new email message, showing the Mail Merge toolbar. If the toolbar doesn't show, then right click on the MS-Word's file menu and select the "Mail Merge" view.
To enter the greeting text which will be sent to each contact, on the Mail Merge toolbar click on the icon labeled "Insert Greeting Line".

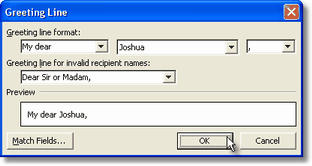
On the Greeting Line window, enter the desired format (how to greet each contact) and click on Ok. You will notice on your document that it will show a tagged line: this line defines the greeting settings for the Outlook Merge feature.

If you didn't use an existing document template, then type the message content, making sure that you don't delete the tagged lines previously inserted. Here is a sample:

When you are done editing the document, click on the "Merge to E-Mail" icon from the Mail Merge toolbar. Then, on the next Merge to Email window, just click Ok, as you already made your selections when you started the mail merge in Outlook.

MS-Word will transmit the email messages to Outlook, which will customize the email for each of the selected contacts. Once this merging job is done, you will notice new outgoing emails stored in your Outbox folder.

To further customize a mail merge session, you may use the other Mail Merge settings of MS-Word. Briefly speaking, each property of your contacts (name, address, phone, business field, etc) can be used within a mail merge in order to customize the outgoing email.
Back to the Email Tips Index.
|
|

