Easy Mail Merge - Screenshots
Easy to Use Mail Merge Outlook Add-in
Easy Mail Merge is designed as an Outlook add-in, so you need to start Microsoft Outlook in order to use the product functions.
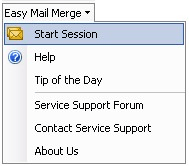
Once MS-Outlook is running, you will notice a new Outlook toolbar, named Easy Mail Merge and displayed on the main Outlook window:

By left clicking on the toolbar button, you can access the main Easy Mail Merge menu. To start your first mail merge, you simply need to click on the "Start Session" button and the data import wizard will open.
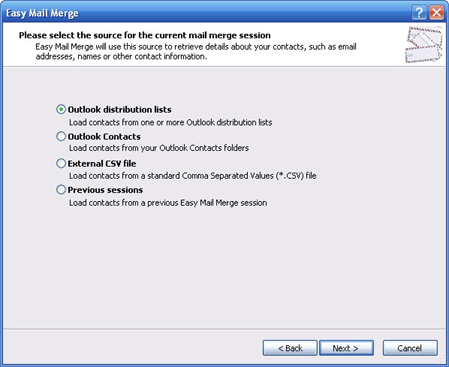
An intuitive wizard interface will guide you through the process of selecting the receivers of your personalised emails. Using the wizard, you can select from where to import the email addresses and related contacts information for the mail merge session. You can choose to:
Import Outlook distribution lists;
Import Outlook Contacts;
Import data from an external CSV file;
Reuse a previously created mail merge session.
The following screenshot shows the mail merge data import wizard options:
Once you have imported the desired contacts into the mail merge session, you are now ready to start composing the message itself. Easy Mail Merge is using the Microsoft Outlook email editor settings to compose emails. Depending on your Outlook settings, the mail merge wizard will launch the Outlook internal email editor or the MS-Word email editor. You will notice a new Outlook toolbar displayed in the message editor window:

Using the Outlook message editor and the add-in toolbar, you can insert regular text, variable text or text created via logical conditions into the outgoing personalised emails.
The Scenario Editor can be accessed via the Easy Mail Merge toolbar of the Outlook window, while you are editing the outgoing personalised message. In order to insert a new text scenario, you need to focus your text prompter at the message content location where you want to insert the scenario, then click on the "Insert Scenario" button from the toolbar:

The following Scenario Editor window will open so you can edit the text script for your mail merge session:
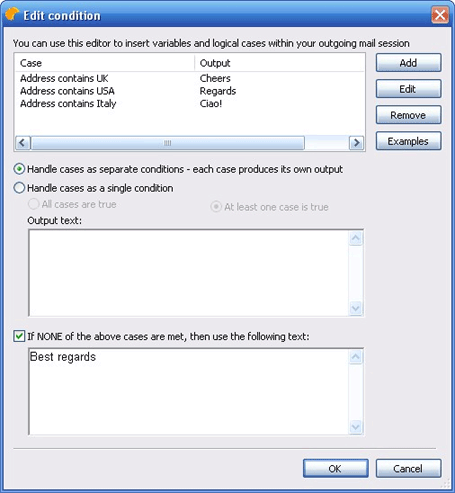
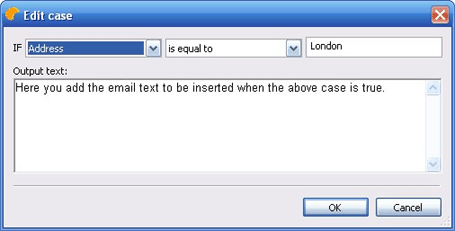
To insert a new mail merge case, you need to click on the Add button of the above Scenario Editor. The Add button will open the individual Case Editor. The Case Editor has 4 fields:
the first one is the field selector, allowing you to choose to which imported field does the case apply;
the second one is the operator of the field, allowing you to choose the true status of the selected field: is empty, is not empty, is equal to, is not equal to, contains.
If you are ready to send out the personalised emails, simply click on the Send button from the Easy Mail Merge toolbar. The regular Outlook Send button does not work while you are in the Easy Mail Merge mode. The add-in Send button will open an Easy Mail Merge window, allowing you to specify sending options for the current session:
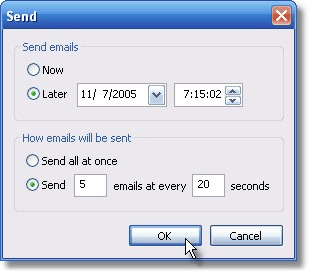
When sending a mail merge session created with Easy Mail Merge, the program will automatically generate individual outgoing email messages for all your list members. For example, if you have 200 newsletter subscribers, Easy Mail Merge will generate 200 unique, personalised emails, each email having a single member email address in its "To" field.
Mail Merge Topics
How to compose a personalized email for a mailing list;
Main advantages of Easy Mail Merge;
Why to personalize email marketing campaigns?
Tips & tricks for safe mail merge emails.
Tutorials: Mail Merge Examples
Using Easy Mail Merge to send a personalized HTML newsletter;
Using mail merge to personalise & send a discounted offer by email;
Sending a meeting invitation via Easy Mail Merge;
Step by step mail merge tutorial.
|
|
System Requirements: Microsoft Windows Me, Windows 2000, Windows XP, Windows Vista, Windows 7 / Microsoft Office 2000, 2002 (XP), 2003, 2007, 2010, 2013 / Outlook 2000, 2002 (XP), 2003, 2007, 2010 and 2013 (x32 and x64).
|