Easy Mail Merge for Outlook
How to Send a Personalized Email Newsletter
The most popular use of Easy Mail Merge is about generating and sending individual emails to the subscribers of a newsletter. Because Easy Mail Merge works as an add-in for Outlook, it benefits from the Outlook features related to composing email messages, such as formatting text or using HTML tags, inserting images, tables, pictures, etc.
If you already have a HTML newsletter design (saved in your Outlook folders or as a stationery item) and if you want to use that design format, before starting a new Easy Mail Merge session, simply open the newsletter template file with Outlook, then select it all (CTRL+A) and copy its content to the Windows clipboard (CTRL+C). Now you are ready to start a new session:

Next, select your subscribers list. If you stored your mailing list outside of Outlook, you can try opening it with Microsoft Excel and then export it as a Windows CSV file. As an alternative, you can use Email Address Collector to extract email addresses and alias names from any local source and to export them as a CSV file.
If you imported your mailing list from a CSV file, make sure you selected the correct column number which contains the email addresses associated with your subscribers:
|


|

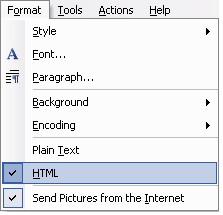
When you are done selecting your newsletter subscribers, the wizard will drive you to the Outlook message editor. If you wish to create a HTML newsletter, make sure you select the HTML format from the Outlook Format menu:

If you want to use a pre-defined HTML template for your newsletter, focus the text prompter within the email body content and then paste (CTRL+V) the previously copied HTML design.
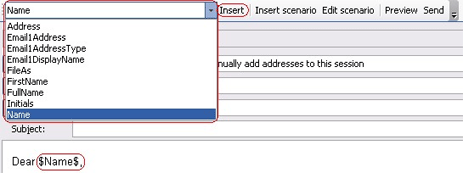
Except for adding static text to your newsletter, you can further personify each email by adding personalised greetings, salutations or any other personalised text that can be created based on the mailing list fields you imported. For example, when starting the mail merge session, if you imported email addresses and alias names, then you can use the alias names field to personalise the introduction of the newsletter.
Let's say you want each subscriber to receive the email starting with "Dear Name" - where "Name" is replaced by the real name of each subscriber: simply type Dear then position your prompter at the text location where you want the name to be inserted, select the field which contains the member names from the Easy Mail Merge toolbar and click on the Insert button. You will notice a new text added to your email content, bordered by the "$" character: when you will send the actual emails, Easy Mail Merge will replace these characters and the text between them with the related field text from the imported mail merge fields:

When you are done editing the email content and subject, you can preview or send out the individual emails. Easy Mail Merge will generate one separate outgoing email for each of your newsletter subscribers. Every outgoing email will include only the email address of its related mailing list member, added on the "To" field of the email message.
Mail Merge Topics
How to compose a personalized email for a mailing list;
Main advantages of Easy Mail Merge;
Why to personalize email marketing campaigns?
Tips & tricks for safe mail merge emails.
Tutorials: Mail Merge Examples
Using Easy Mail Merge to send a personalized HTML newsletter;
Using mail merge to personalise & send a discounted offer by email;
Sending a meeting invitation via Easy Mail Merge;
Step by step mail merge tutorial.
|