Mass Emails with Easy Mail Merge
Tips & Tricks for Sending Safe Mail Merge Emails
Sending and personalising emails through a mail merge session does not only makes the emails to look & feel friendlier. It also offers a reliable method for actually delivering the emails to the intended receivers. As more and more Internet Service Providers are deploying server-sided anti-spam components, it is likely that a regular BCC or CC email will be captured by such anti-spam programs, as such emails are normally flagged as spam/mass/bulk emails.
However, as explained above, mail merge by its own only helps you to pass anti-spam rules of the receiver's mail server. But how about the outgoing mail server, the one through which you need to send the emails? Depending on your ISP, you may have problems sending all emails at once. If you plan to send hundreds of emails or more, sending them all at once will likely alarm your own ISP about potential spamming activities conducted through your account and thus your ISP will probably limit or disable your account until the situation is clarified.
Even if your email account is supposed to allow you send & receive a unlimited number of emails, don't blame your ISP too much if the ISP restricted your account as a result of sending all your merged emails at once. You ISP is at risk at being flagged as a spamming source, so you need to carefully avoid such situations.
This is why Easy Mail Merge includes some safe sending options. You have much higher chances of delivering your emails if you don't send them all at once. Some ISPs restrict the number of emails that are allowed to be sent per minute, so maybe it worth calling your ISP and asking about such restrictions, so you can properly setup and match the Easy Mail Merge sending options with your ISP restrictions. If you can't obtain such information from your ISP, then just to be on the safe side, choose to send only 1-10 emails at once and choose a delay of at least 30-60 seconds between each sending time.
|


|
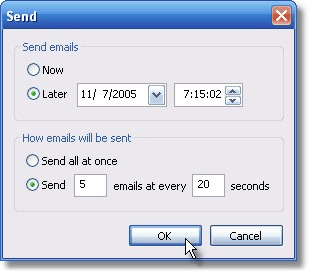
When you click the "Send" button of the Easy Mail Merge toolbar, you will be prompted to select your sending settings. The following screen will be displayed:

Using this window, you can choose to:
send emails now or to schedule them for later;
send all of them at once or send only a few at a time;
if you didn't select to send all at once, you can select the delay periods between each email trigger.
To generate the outgoing emails and start sending the emails, click on the OK button. You will notice a progress bar displaying the progress of generating the individual emails. When this process is over, you will notice more emails stored in your Outlook Outbox email folder. For example, if you imported 200 list members, there will be 200 Outbox emails. If you choosed to schedule them or not to send all at once, there will be less and less Outbox emails, as the email sending process goes on in time.
Mail Merge Topics
How to compose a personalized email for a mailing list;
Main advantages of Easy Mail Merge;
Why to personalize email marketing campaigns?
Tips & tricks for safe mail merge emails.
Tutorials: Mail Merge Examples
Using Easy Mail Merge to send a personalized HTML newsletter;
Using mail merge to personalise & send a discounted offer by email;
Sending a meeting invitation via Easy Mail Merge;
Step by step mail merge tutorial.
|