|
|
Home > Outlook Email Software > Easy Mail Merge > Mail Merge Example
Easy Mail Merge for Outlook
Using mail merge to personalise & send a discounted offer by email
Sample scenario: you have a product line consisting of 6 products and you want to send an email to all your customers for upgrading to the latest versions of your products, with different discount coupon codes depending on the product they purchased.
For example, if Mr. James Smith purchased product XYZ, you want to send him an email with the discount coupon of XYZ:
"Dear James Smith,
You are receiving this email because you are a registered customer of product XYZ. For a limited time, we offer you a special discount for upgrading to the latest version of product XYZ. If you wish to take advantage of it, simply go to our site at www.ourdomain.com and click on the ordering page, then select product XYZ and enter the following discount coupon number: ABCD000-0.
Kind regards,
The Company".
Of course, you don't want to waste several hours or days to manually make & send the personalised email for each customer: Easy Mail Merge can do the work for you in minutes.
Before starting a new session of Easy Mail Merge, you need to have the source (as a CSV file or as Outlook Contacts) from which you will import the customers' details. If you keep your customer records within a e-commerce web service or as a part of a bigger CRM (or else) web solution, then it's likely that you can directly export the records from your database to a CSV file. If you can't find such a function on the application interface, contact your application service provider to assist you on exporting the records to a Windows CSV file.
|



|
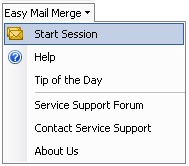
Let's say the CSV file contains 600 lines (belonging to 600 customers) and 6 columns per line: Customer Name, Email Address, Company Name, Purchased Product, Number of Licenses, Postal Address. Start a new mail merge session by clicking on the "Start Session" button of the Easy Mail Merge - Outlook toolbar:
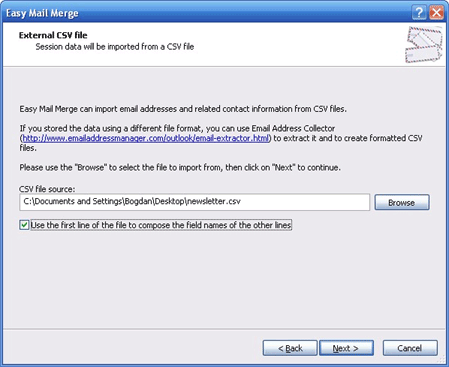
The Source Import Wizard will start: when you are asked to select the source type, simply select to import from a CSV file, click on "Next" and then browse your local disk folders and select the CSV file to be imported. If the CSV file includes a header line (naming each column), then please mark the checkbox called "Use the first line of the file to compose the field names of the other lines".
If your external data source is not formatted as a CSV file, you can try opening it with Microsoft Excel and then export it as a Windows CSV file. As an alternative, you can use Email Address Collector to extract email addresses and alias names from any local source and to export them as a CSV file.
After you selected the CSV source, click on the "Next" button to start importing data.
A dialog box will be displayed during the CSV file import. Depending on the size of the CSV file, the import process may take up to several minutes. You can always cancel the import process by clicking on the "Cancel" button. When the CSV file import is done, the Easy Mail Merge wizard will display a list with the imported data:
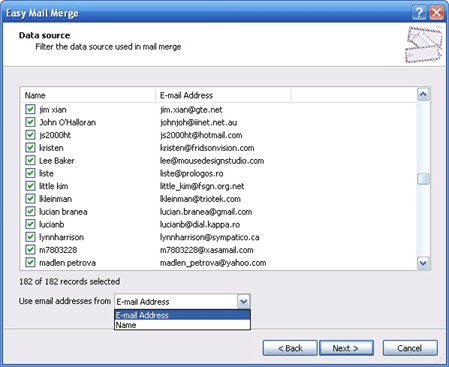
IMPORTANT: you must always choose the column which corresponds to the email address fields, otherwise Easy Mail Merge will not be able to create the outgoing emails. On our sample scenario, the email addresses were located on the second column of the imported CSV file, so select the second column in the "Use email addresses from..." drop-down list.
If your CSV file does NOT include a column header, then Easy Mail Merge will name the columns as F1, F2, F3, etc until the last column. For example, the 2nd column of your CSV file will be named F2.
At this point, you can manually add/remove list members from the imported fields: all you need to do is to select/deselect the checkbox from the start of each record line. By default, all records are selected. When you are done with it, click on the "Next" button so the wizard will guide you to the Outlook message editor.
Now you can start composing and personalising the outgoing email. Let's review again the desired outgoing email - you need to personify it so it looks like:
"Dear James Smith,
You are receiving this email because you are a registered customer of product XYZ. For a limited time, we offer you a special discount for upgrading to the latest version of product XYZ. If you wish to take advantage of it, simply go to our site at www.ourdomain.com and click on the ordering page, then select product XYZ and enter the following discount coupon number: ABCD000-0.
Kind regards,
The Company".
As per this sample scenario, you have to personalize the underlined text parts and so to insert field values and to make scenarios in order to achieve the desired email content
to personalise the greeting text, simply type "Dear " and then select the customer name field from the Easy Mail Merge drop-down list. This operation will insert a field code within the email body content;
to personalise the product name, similar to the above greetings text, you need to select the purchased product field from the imported records and to insert it at the text position where you want it to be displayed in the final email message;
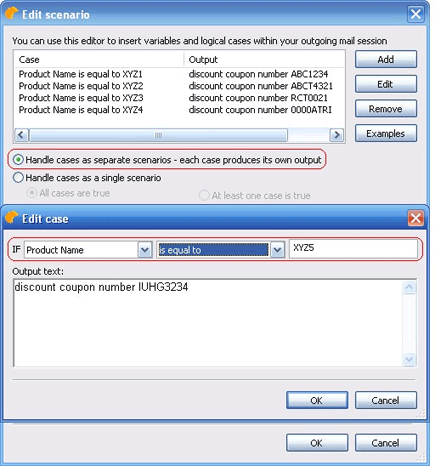
to customize and insert various coupon numbers depending on the purchased product, you need to insert a new scenario at the text position where you want the personalised coupon number to be displayed. The Scenario Editor will open: in order to insert a different coupon number depending on the product name, you have to define a case per each product name:
When you are done editing the email content and subject, you can preview or send out the individual emails. Easy Mail Merge will generate one separate outgoing email for your customers. Every outgoing email will include only the email address of its related customer, added on the "To" field of the email message.
Mail Merge Topics
How to compose a personalized email for a mailing list;
Main advantages of Easy Mail Merge;
Why to personalize email marketing campaigns?
Tips & tricks for safe mail merge emails.
Tutorials: Mail Merge Examples
Using Easy Mail Merge to send a personalized HTML newsletter;
Using mail merge to personalise & send a discounted offer by email;
Sending a meeting invitation via Easy Mail Merge;
Step by step mail merge tutorial.
|
|